Apps & tokens
Overview
Seequent Evo integrations need a user's consent to access data using Seequent APIs and SDKs. Evo uses OAuth 2.0 to grant access, and a created app provides the means to initiate the OAuth process.
Before you can create an access token you must first create your app. You can create and manage apps directly in the Seequent Developer Portal on the My apps page. During registration you must provide basic information such as the app name, type, and (for most app types) a redirect URI, which redirects users to the appropriate web server, browser, or native app.
Requirements
To create an app you must:
- Be signed in to the Seequent Developer Portal with a Bentley user account that belongs to an organisation with Evo entitlements.
- Accept the terms of service when prompted on the My apps page.
- Have a method to securely store the app credentials that are generated.
About Evo access tokens
Access tokens are digital keys used to verify and authenticate a user's identity before granting access to resources. Access tokens are essential for secure authentication and authorisation processes, ensuring that only authorised users can access specific data or functionalities.
Scope is a mechanism in OAuth 2.0 to limit an application's access to a user's account. An application can request one or more scopes and the access token issued to the application will be limited to the scopes granted. Apps created in the Seequent Developer Portal will include a set of Evo scopes.
When requesting an access token you must include a list of scopes. Consult the list below to determine which scopes you need to include.
Required Evo scopes
You should always include these scopes in your OAuth requests because they provide access to critical Evo APIs.
evo.discoveryto access the Evo Discovery API.evo.workspaceto access the Workspaces API.
Optional Evo scopes
Include these scopes in your OAuth requests if you intend to work with the corresponding Evo API.
evo.blocksyncto access the Block Model API.evo.fileto access the File API.evo.objectto access the Geoscience Object API.
Optional additional scopes
OAuth apps can refresh a user's access token without requiring the user to sign-in again. This functionality is only available when you include the offline_access scope in your OAuth request. This feature is not available (or required) when using a machine-driven or service app.
Secure storage of app credentials and tokens
Before creating a new app, make sure you have a secure way to store its credentials. These credentials, along with any access tokens your app generates, must be treated like passwords. Anyone with access to them can use your app to access data.
Hints for securely storing app credentials
- Don't share app credentials with colleagues over email or internal messaging systems. Instead, credentials should be stored in a secure password manager.
- The credentials of a service identity (from a service or machine-driven app) are particularly sensitive, since a bad actor who obtained those credentials could easily access any Evo data available to the service identity.
Hints for securely storing access tokens
- Never commit access tokens to source control (for example, in a GitHub repository). Use pre-commit hooks and other security tools to prevent accidental exposure.
- Always save access tokens to a
.envfile in your project folder or to your system environment directly instead of hard-coding tokens into your source files. - Never expose access tokens in error messages or log files.
App types
Choose an app type that best suits your development requirements.
-
User-driven apps require a real person to sign in. Since the access token represents this person, any interactions with Evo will be attributed to them.
The following user-driven app types are available:
-
Machine-driven apps do not require a real person to sign in. Instead, a service identity is created which has its own unique profile and email address. The service identity must first be added to your Evo instances and then to your Evo workspaces just like a regular user.
- Service — a machine-to-machine application requiring no user interaction, using the client credentials flow.
User-driven app
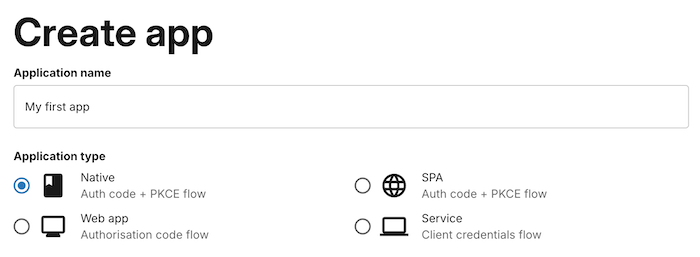
Create the app
User-driven apps require the user to periodically re-authenticate to renew the access token, so this type of app may not be suitable for machine-driven scripts. If you need your scripts to run without any user interaction, create a machine-driven app instead.
-
Sign in to the Seequent Developer Portal and navigate to the My apps page. You may need to agree to Bentley developer terms before proceeding.

-
Click Create app.
-
Enter an app name and select one of the user-driven app types: Native, SPA, or Web app.
-
Enter one or more redirect URIs (required). The redirect URI redirects users to the appropriate web server, browser, or native app after authentication. For example, enter
http://localhost:3000/signin-callbackwhen running your app locally. A dropdown menu with common presets (such as the Evo Python SDK default and Postman OAuth URLs) is available to help you quickly select a URI.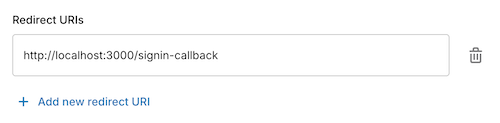
-
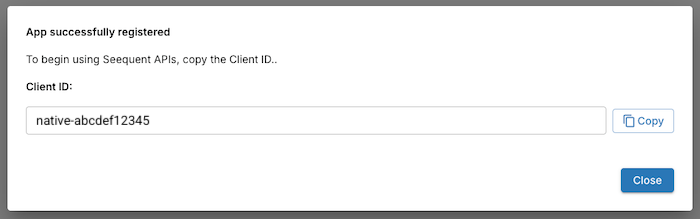
Click Create app.
-
A dialog displays the unique Client ID of your application. Be sure to save the client ID in a secure place.
Machine-driven app
Create the app
Data published to Evo using a service application will be associated with a service identity. If you need data to be directly associated with the user who made the API calls, create a user-driven app that requires a user to sign in with their own credentials.
-
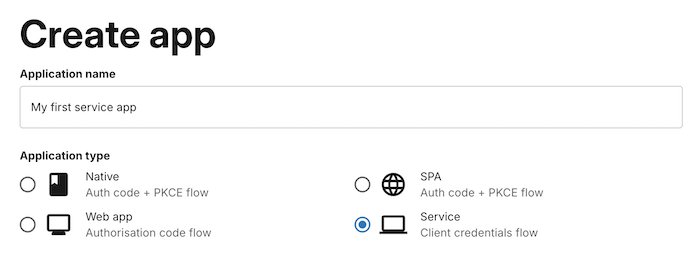
Sign in to the Seequent Developer Portal and navigate to the My apps page. You may need to agree to Bentley developer terms before proceeding.
-
Click Create app.
-
Enter an app name and select the Service app type (client credentials flow).
-
Click Create app.
-
A dialog displays the Client ID and Client Secret for your app.

Add the service identity to your Evo instance
Just like adding a new colleague to your Evo instances, your new service identity must be added to the Evo instances where you intend to utilise Evo services.
Contact your Evo instance administrator, send them the client email of your new service identity, and inform them that this new account will be used to integrate with Evo services.
Only after the service identity has been added to an Evo instance should you proceed to the next step.
Add the service identity to an Evo workspace
The service identity must also be assigned to any Evo workspace that the identity needs to access with the Seequent Evo APIs.
-
Sign in to the Evo portal.
-
In the Workspaces tab click to open the appropriate workspace.
-
Click the Permissions tab.
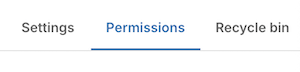
-
Click the Enter email address box and paste the email of the service identity. Give the service identity the appropriate user role and click Assign user. If the identity will be publishing new data, assign the Editor role, otherwise, assign the Viewer role.

Managing your apps
Manage app owners
App owners can be managed directly from the app's edit page.
-
Navigate to the My apps page and click the name of the app.
-
Under Application owners, you can see the current list of owners.
-
Click Add owner to add a new owner by entering their email address.
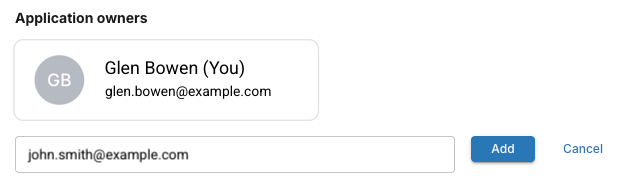
-
Click the remove icon next to an owner's name to remove them (you cannot remove yourself).
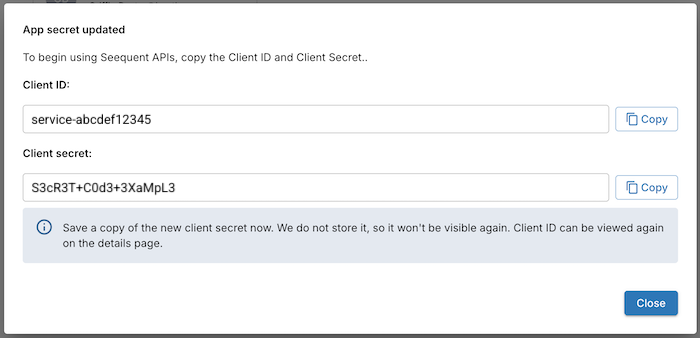
Regenerate a client secret
For service apps, you can regenerate the client secret from the app's edit page.
-
Navigate to the My apps page and click the name of the service app.
-
Click Regenerate Client Secret.
-
A dialog displays the new client secret. Save it securely before closing — it won't be shown again.
Creating and managing access tokens with Python
Seequent actively maintains open-source projects on GitHub that make it easy to build an Evo integration using Python.
Visit Evo Python SDK to learn how to install and use the SDK.
If you are building your integration in a language other than Python, you can still learn Evo programming concepts by visiting the link above.